

Tiếng Anh Chuyên Ngành Ô Tô - Phần 125 - Lắp Và Điều Chỉnh Vít Lửa (tiếp theo)
Tiếng Anh Chuyên Ngành Ô Tô - Fitting And Adjusting Contact-Breaker Points - Lắp Và Điều Chỉnh Vít Lửa
Contact breaker types- Các loại vít lửa
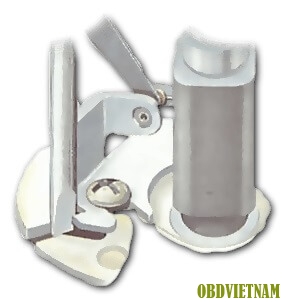
Lucas - old and new type- Lucas - loại cũ và mới

Ease the spring pressure with a screwdriver and remove the terminal plate - Giảm áp suất lò xo bằng tua vít và tháo cầu đấu nối điện.

Remove the moving contact assembly, which is in one piece - Tháo đầu tiếp điện bằng các rút đầu cố định ra khỏi chốt giữ.

Undo the single fixing screw and remove the fixed contact plate - Tháo vít cố định duy nhất và tháo tấm tiếp xúc cố định.
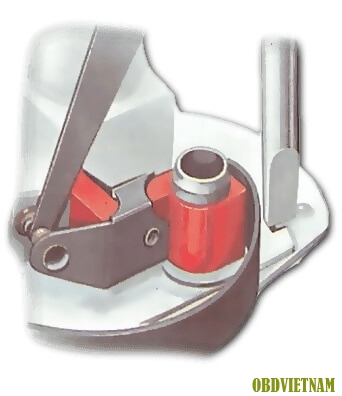
Set the gap with a screwdriver - Thiết lập khe hở bằng tua vít.
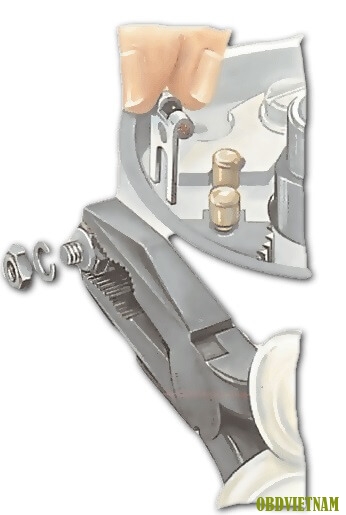
On the old type, unscrew the nut, at the free end of the spring, using pliers or a small spanner.
Trên loại cũ, tháo đai ốc, ở đầu tự do của lò xo, sử dụng kìm hoặc cờ lê nhỏ.
Lift off the top nylon insulator and the two terminals underneath it, noting the sequence in which the various parts are positioned - particularly the insulating washers.
Lấy đầu cách điện nylon ra và hai đầu cực bên dưới nó, lưu ý trình tự trong đó các bộ phận khác nhau được lắp đặt - đặc biệt là các vòng đệm cách điện.
Remove the single screw next to the terminal post. Lift off the assembly.
Tháo ốc vít duy nhất bên cạnh cọc bình. Nhấc ra khỏi lắp ráp.
Fit the new assembly in exactly the reverse order.
Lắp ráp mới theo đúng thứ tự ngược lại.
Set the gap by levering with a screwdriver blade in the adjusting slot.
Đặt khoảng cách bằng cách đòn bẩy với lưỡi tua vít trong khe điều chỉnh.
On the newer one-piece type the terminal plate simply lifts off.
Trên loại nguyên khối mới hơn cầu đấu nối điện chỉ cần nhấc lên.
First gently take some of the pressure off the spring then lift out the terminal plate with the leads still attached to it.
Đầu tiên nhẹ nhàng lấy một ít áp lực ra khỏi lò xo sau đó nhấc cầu đấu nối điện với các dây dẫn vẫn được gắn vào nó.
Fit the one-piece contact over the pivot post and replace the low-tension (LT) leads over the insulated base of the contact set. Secure with the plastic nut.
Lắp công tắc lên trụ trục và thay thế các dây áp thấp (LT) trên đế cách điện của bộ tiếp điểm. An toàn với đai ốc nhựa được lắp vào.
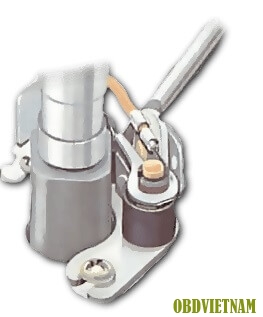
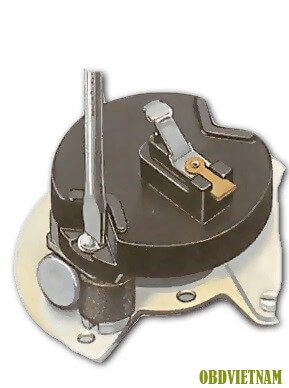
Marelli

With the terminal lead detached, ease off the circlip on the contact pivot post - Với dây nối đầu cực bị tách ra, nới lỏng vòng đệm trên điểm tiếp xúc chốt trụ.

Adjust the gap by turning a screwdriver in the slot in the centre of the assembly - Điều chỉnh khe hở bằng cách vặn tua vít trên đầu rãnh tua vít ở trung tâm của cụm.
Remove the nut from the terminal post on the side of the distributor, and the main fixing screw of the assembly.
Tháo đai ốc khỏi đầu cọc ở phía bên của bộ chia điện và vít cố định chính của cụm.
Pull the plastic terminal block up and off its mounting bracket, and detach the free end of the spring.
Kéo cọc nhựa lên và ra khỏi bệ đỡ máy, và tháo đầu tự do của lò xo.
Remove the circlip over the contact pivot and lift off the various parts, noting the order in which they are fitted.
Tháo các vòng đệm trên điểm tiếp xúc chốt trụ và nhấc các bộ phận khác nhau, lưu ý thứ tự mà chúng được trang bị.
When reassembling remember to re-attach the lead from the condenser.
Khi lắp lại hãy nhớ gắn lại dây dẫn từ tụ điện.
Bosch
On some Bosch distributors, a plate held by screws covers the contact assembly - Một số bộ chia điện hãng Bosch, tấm chắn được giữ bởi nắp chặn cụm kết nối.
Disconnect the lead from the terminal on the side of the unit.
Ngắt kết nối dây dẫn từ đầu cực ở phía bên của thiết bị.
Gently press the spring, free it from the top on the lower part of the assembly and lift off complete with moving contact.
Nhẹ nhàng nhấn lò xo, giải phóng nó từ đỉnh trên phần dưới của lắp ráp và nhấc ra hoàn toàn với tiếp xúc di chuyển.
Remove the screw retaining the fixed contact and lift off the contact.
Tháo vít giữ tiếp điểm cố định và nhấc tiếp điểm ra.
When reassembling, fit the new fixed contact point over the peg on the baseplate and refit the screw. Fit the LT lead to the peg on the plastic clip, and fit the new moving point.
Khi lắp lại, lắp điểm tiếp xúc cố định mới lên trên chốt trên tấm đế và chỉnh lại vít. Lắp dây áp thấp vào chốt trên vòng đệm bằng nhựa và thay thế điểm tiếp điện mới.
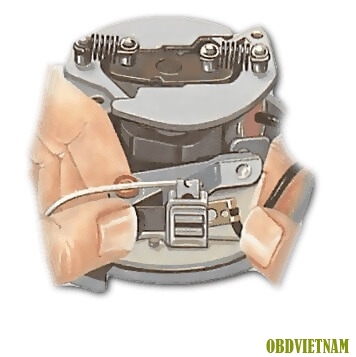
Disconnect the lead from the push-on terminal at the side of the unit - Ngắt kết nối dây dẫn từ đầu cót tại điểm tiếp xúc với mass.

Gently ease the spring pressure and remove the spring and moving contact - Nhẹ nhàng giảm áp lực lò xo và tháo lò xo và tiếp điểm của công tắc.

Fit the new moving contact after fitting the fixed contact plate - Thay thế đầu tiếp điểm mới sau khi lắp tấm tiếp xúc cố định.

Insert a screwdriver in the slot at the side of the fixed contact plate and turn it to the left or right to set the gap - Chèn một tua vít vào khe ở bên cạnh tấm tiếp xúc cố định và xoay nó sang trái hoặc phải để lắp vào khe hở.
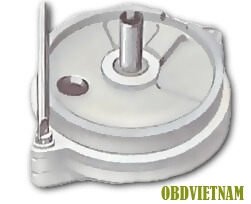
Nippon Denso

Slacken the terminal nuts and lift the lead - Nới lỏng các đai ốc và lấy dây nối.
Remove the fixing screw and gently prise out the assembly - Tháo vít cố định và nhẹ nhàng lấy ra cụm lắp ráp.
The gap is adjusted by swinging the assembly around the moving contact pivot point - Khe hở được điều chỉnh bởi xoay cụm lắp ráp xung quanh chốt cố định tiếp điểm của công tắc.
Loosen the two nuts on the terminal on the side of the distributor and detach the lead. Remove the two main fixing screws.
Nới lỏng hai đai ốc trên đầu cực ở phía bộ chia điện và tháo dây dẫn. Tháo hai vít cố định chính.
Lift off the old assembly, fit the new one and reconnect the lead. The gap is adjusted by swinging the assembly around the moving contact pivot point.
Lấy cụm lắp ráp cũ ra, lắp cái mới và nối lại dây dẫn. Khe hở được điều chỉnh bằng cách xoay cụm xung quanh chốt cố định tiếp điểm của công tắc.
Mitsubishi

Remove the two crosshead screws holding the contact assembly after detaching the earth lead - Tháo hai ốc vít chữ thập giữ cụm tiếp xúc sau khi tháo dây nối đất.

Set the gap by rotating the V-notched adjuster with a screwdriver - Đặt khoảng cách bằng cách xoay bộ điều chỉnh V-notched bằng tua vít.
Loosen the screw holding the earthing lead from the contact set to the distributor body, then pull the lead clear. Remove the two fixing screws with their washers and spring washers. Lift off the assembly.
Nới lỏng vít giữ dây nối mát từ bộ tiếp xúc đến thân của bộ chia điện, sau đó kéo phân biệt dây dẫn rõ ràng. Tháo hai ốc vít cố định với vòng đệm và vòng đệm lò xo của chúng. Tháo ra khỏi cụm lắp ráp.
When fitting the new one, note the small lug on the bottom which fits into a hole in the distributor. Refit the earthing lead to the furthest away of the two fixing screws. Refit the condenser lead and tighten its screw.
Khi lắp cái mới, lưu ý cái mấu khớp nhỏ ở phía dưới vừa với lỗ của bộ chia điện. Chỉnh lại dây mát dẫn đến xa nhất của hai ốc vít cố định. Chỉnh lại dây dẫn đến tụ điện và siết vít của nó.
Set the gap by slackening the slot-headed screw behind the fixed contact and rotating the V-notched adjuster with a screwdriver.
Thiết lập khoảng cách bằng cách nới lỏng đầu khe vít phía sau tiếp điểm cố định và xoay bộ điều chỉnh V-notched bằng tua vít
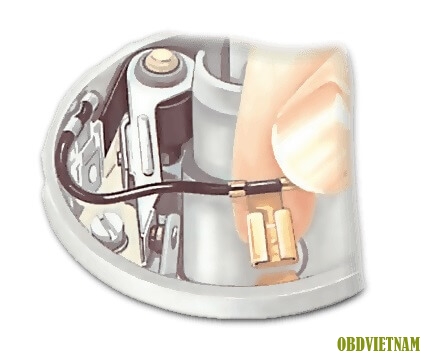
AC Delco

Release the terminals by gently easing the contact-breaker spring pressure - Nới lỏng các đầu cực bằng cách giảm nhẹ áp lực lò xo vít lửa.

Move the fixed contact plate to set the gap by inserting a screwdriver into the slot - Di chuyển tấm tiếp xúc cố định để đặt khoảng cách bằng cách chèn một tua vít vào khe.
There are two types: one has the normal layout, but the other has the centrifugal advance weights above the points.
Có hai loại: một loại có bố cục bình thường, nhưng loại khác có quả văng của cơ cấu đánh lửa sớm ly tâm trên các vít lửa.
On the first type, press the spring of the moving point to release the terminals, and lift them out.
Trên loại đầu tiên, nhấn lò xo của điểm di chuyển để nới lỏng các đầu cực và nhấc chúng ra.
Loosen the screws holding the rotor arm - Nới lỏng các ốc vít giữ mỏ quẹt.
Slide out the terminal leads while easing the spring pressure - Trượt ra khỏi đầu cosse trong khi giảm áp lực lò xo.
Remove the fixing screw, lift off the assembly and fit the new one.
Tháo vít cố định, nhấc cụm lắp ráp ra và lắp một cái mới.
On the second type, loosen two screws to free the rotor arm.
Trên loại thứ hai, nới lỏng hai ốc vít để mở mỏ quẹt.
Hold the arm meanwhile, then lift off complete with the screws so as not to drop them - this allows access to the contact set.
Giữ mỏ quẹt trong lúc đó, sau đó nhấc đồng thời các ốc vít để không làm rơi chúng - điều này cho phép vào bộ tiếp xúc.
Press the spring of the moving point with a screwdriver blade to release the leads, then slide them off: one upwards and the other sideways.
Nhấn lò xo của điểm di chuyển bằng lưỡi tua vít để rút dây nối, sau đó trượt chúng ra: một bên lên và các thanh trượt khác
Remove the fixing screws and spring washers to release the assembly: you may need to turn the engine to move the weights out of the way.
Tháo các vít cố định và vòng đệm lò xo để nới lỏng cụm: bạn có thể cần phải quay động cơ để di chuyển trọng lượng ra khỏi đường đi.
There is a slot for levering with a screwdriver to adjust the gap.
Có một chỗ để dung đòn bẩy với một tua vít để điều chỉnh khe hở.
Motorcraft

Remove the two fixing screws after disconnecting the leads - Tháo 2 vít cố định sau khi ngắt dây nối.

Move the fixed contact plate to set the gap by turning a screwdriver in the slot - Di chuyển tấm tiếp xúc cố định để đặt khoảng cách bằng cách xoay tua vít trong khe.
Disconnect the two leads by releasing the crosshead screw at the contact-breaker terminal.
Ngắt kết nối hai dây dẫn bằng cách vặn ốc vít chữ thập ở đầu cực vít lửa.
Remove the two screws holding the contact-breaker set to the distributor baseplate and lift off the old assembly.
Tháo hai ốc vít giữ bộ vít lửa được đặt vào đế của bộ chia điện và nhấc cụm lắp ráp cũ ra.
Fit the new one, re-attach the leads and retighten their screw.
Lắp cái mới, gắn lại dây dẫn và vặn lại vít của chúng.
Ducellier
Loosen the terminal nut on the side of the distributor body, and release the slotted end of the moving contact spring.
Nới lỏng cọc cực ở phía bên của thân bộ chia điện và nới lỏng đầu có rãnh của lò xo của công tắc điện.
Remove the small spring clip across the terminal and pivot posts and lift off the washers.
Tháo các vòng đệm nhỏ dọc đầu cực và trục và tháo vòng đệm ra.
Slacken the nut on the outside of the distributor to release the moving contact spring - Làm lỏng đai ốc ở bên ngoài của bộ chia điện để nới lỏng lò xo của công tắc điện.

Use the blade of a thin screwdriver to open up and remove the spring clip across the pivot and terminal posts - Sử dụng lưỡi tua vít mỏng để mở và tháo vòng đệm dục trục và cọc nối.
Lift the moving contact off the pivot post. Release the fixed contact securing screw and lift off the contact.
Nhấc bộ công tắc điện ra khỏi chốt giữ. Nới lỏng đầu vít cố định bộ công tắc và nhấc tiếp điểm ra.
Screw on the new fixed contact; do not tighten its screw fully. Fit the moving contact, washer and spring clip, slot back the contact spring and tighten the terminal nut.
Siết đầu tiếp điểm; không nên siết quá mạnh. Lắp tiếp điểm di chuyển, vòng đệm và đai kẹp, quay lại lò xo tiếp xúc và siết chặt đai ốc đầu cực.
Set the gap by moving the fixed contact plate with a thin screwdriver. Lubricate the cam spindle.
Đặt khoảng cách bằng cách di chuyển tấm tiếp xúc cố định bằng tua vít mỏng. Bôi trơn trục cam.

Lift the moving contact off the pivot post - Lấy tiếp điểm di động ra khỏi chốt giữ.

Set the gap by inserting a thin screwdriver in the fixed contact-plate slot and moving the plate - Đặt lại khe hở bằng cách chèn lưỡi tua vít mỏng vào rãnh giữa đầu đĩa tiếp và đĩa của bộ công tắc điện.
Hy vọng với bài Tiếng Anh chuyên ngành ô tô về Lắp Và Điều Chỉnh Vít Lửa (Fitting And Adjusting Contact-Breaker Points) hữu ích đối với các bạn. Nếu thích bài viết này, hãy chia sẻ cùng với bạn bè và đừng quên kết nối với chúng tôi!
- Website: Công ty Cổ phần OBD Việt Nam
- Fanpage: Máy Chẩn Đoán Ô Tô Việt Nam
- Youtube: OBD Việt Nam - Máy Chẩn Đoán Ô Tô
Mọi chi tiết xin liên hệ :
- Bộ phận CSKH phía Bắc: 0911 140 141
- Bộ phận CSKH phía Nam: 0913.92.75.79
Tin liên quan
- Chương Trình Khuyến Mãi 30/4-1/5 : Khuyến Mãi Tưng Bừng – Mừng Đại Lễ
- OBD Việt Nam Thông Báo Nghỉ Lễ Giỗ Tổ Hùng Vương 2024
- Chia Sẻ Miễn Phí Tài Liệu Về Hệ Thống Common Rail Fuel Diesel
- Hướng Dẫn Cập Nhật Phần Mềm Máy Chẩn Đoán Autel Mx900 Và Autel Ds900
- HÁI LỘC NĂM MỚI - PHƠI PHỚI QUÀ XUÂN OBD HÀ NỘI
- Hái Lộc Năm Mới - Phơi Phới Quà Xuân
- Thư Chúc Tết Nguyên Đán Giáp Thìn 2024
- OBD Việt Nam Thông Báo Nghỉ Tết Nguyên Đán 2024
- Chia Sẻ Miễn Phí Tài Liệu Khoá Đào Tạo New Model Mazda3 (CKD) & Cx-5 (CBU)
- OBD Việt Nam Thông Báo Nghỉ Lễ Tết Dương Lịch 2024
Danh mục tin tức
- Hành Trình Chuyển Giao
- Cẩm Nang Sửa Chữa Ô Tô
- Sự Kiện OBD Việt Nam
- Kiến Thức Ô Tô
- Chăm Sóc Xe Ô Tô
- Tiếng Anh Chuyên Ngành Ô Tô
- Hướng Dẫn Sử Dụng Phần Mềm
- Hướng Dẫn Sử Dụng Máy Chẩn Đoán
- Đánh Giá Máy Đọc Lỗi
- Kiến thức xe tải nặng, máy công trình
- Bản Tin Công Nghệ Ô Tô
- Chia Sẻ Tài Liệu Ô Tô
- Cảm Nhận Của Khách Hàng
- Thông Tin Cần Biết
- Setup Garage Chuyên Nghiệp
- Hỏi Đáp Sản Phẩm
Tin xem nhiều

Chương Trình Khuyến Mãi 30/4-1/5 : Khuyến Mãi Tưng Bừng – Mừng Đại Lễ

OBD Việt Nam Thông Báo Nghỉ Lễ Giỗ Tổ Hùng Vương 2024

Chia Sẻ Miễn Phí Tài Liệu Về Hệ Thống Common Rail Fuel Diesel

Hướng Dẫn Cập Nhật Phần Mềm Máy Chẩn Đoán Autel Mx900 Và Autel Ds900

Thư Chúc Tết Nguyên Đán Giáp Thìn 2024
Vui lòng điền vào mẫu dưới đây, để chúng tôi có thể cung cấp cho bạn thông tin cập nhật về những thông tin mới của chúng tôi